Cast Net General Information
Wherever you may fish, live bait is always the best lure. To save time and money, you need to keep live bait ready. Cast netting is the most economic tool for catching your own bait. You can also use a cast net to catch shrimp, larger fish, mullet, etc.
Cast netting is very popular, either in fresh or salt water, and can be used in different applications from Sport to Commercial fishing. Many people use cast nets, from kids to experienced professional fishermen, almost everywhere in the world.
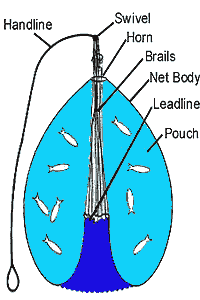
CAST NET BASIC STRUCTURE
- Swivel: two metal loops or rings attached together, that turn at both ends.
- Hand line: a rope which is attached to the swivel on one end, with the other end attachded to the caster's wrist.
- Horn: a ring with an indentation around the center, where the top of the net is tied.
- Lead Line: a rope with sinkers attached. This rope is at the outside perimeter of the net to sink it.
- Brail Lines: lines attached to the swivel at one end and to the leadline at the other. Their function is to pucker the net, thus trapping the catch.
- Netting: made from nylon multifilament or monofilament to form the desired mesh.
HOW CAST NETS WORK
Throwing the net creates a driving force that causes the lead line to open the net to a flat form, the lead weights then sink the net. After the net has sunk, and the brail line is pulled, the lead line is forced to close,thus, creating a pouch in the net which holds the catch, trapping a school of shrimp or fish. After pulling the net from the water, opening the leadline will cause the catch to fall out.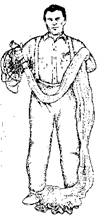 | STEP 1:
With net straightened and lying between your feet, fasten the tag end of the retrieved rope to the right wrist. Then coil the rope in small coils and hold them in your right hand. Place the throat of the net on top of the rope coils in your right hand. Then slide your left hand about a third of the way down the net. |
 | STEP 2:
Coil the length of the net you just measured and place it in your right hand. Now slide your left hand down the net to crotch level. Make a coil of this second length of net and also place it in your right hand. You should now have two roughly equal coils of net in your right hand and about two-and-a-half feet of net left dangling. |
 | STEP 3:
Kneel on your right knee and place your left foot forward. Pull one loop of the lead line from the rear of your bundle and lay that loop across your right elbow as far as it will go without pulling in your right hand. |
 | STEP 4: Starting at your right elbow, go clockwise around the lead line for approximately four feet. Now lay that lead line over your left thigh. Continue in a clockwise manner and lay the net across your left thigh until you have approximately half of the remaining net and lead line draped across your left thigh. You should now be supporting half of the lead sinkers with your left leg and the other half with your right hand. |
 | STEP 5:
With the net divided into roughly halves, put the pinkie finger of your left hand through the net mesh of the first lead line that you laid over your left thigh. The proper location is through the bottom mesh (next to the lead line) right on top of your left thigh. |
 | STEP 6:
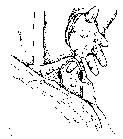
This is the way your left hand grips the net. The pinkie finger is through the mesh at the lead line and the third finger lays by the pinkie as a sort of guard. The mesh of the net is held between the thumb and first two fingers and rests against the top of the third and pinkie fingers. |
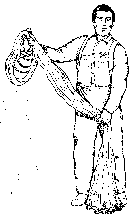
 | STEP 7:
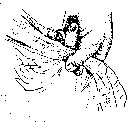
This is what the net looks like when you are holding it properly and are prepared to throw it.
The small loops of the line and two loops of the net are held in the right hand. The retrieval line is tied around the right wrist. One loop of lead line lies across the wrist. One loop of lead line lies across the right elbow. Approximately half of the lead line is supported by the right hand and is hanging about two and a half feet below the right hand. The balance of the net and lead line is held in the left hand and in the grip described in Illustration 6. The lead line is hanging about a foot to a foot and a half down from the left hand. Note that there is no call for lead line held in the mouth or for draping wet net across your shoulder. |
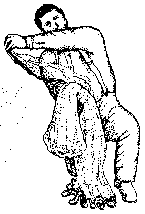
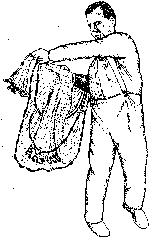 | STEP 8:
The windup is the first part of the throw. Ideally the left foot is forward and pointed about 45
degrees to the right of where you intend to throw. The right foot is behind the left at just over the
shoulder width distance, and is roughly parallel. Rotate your arms back to the right and shift your weight to your right foot. As you spin back forward your weight will shift back to your left foot. The throw is more of a slinging motion in which both arms naturally extend to aim the net.
The release is just to let go with your hands. The net will naturally peel off your right elbow andoff your left pinkie finger. Experience and practice will help perfect your aim. |
STEP 9:
With a little practice you can have results like this, also. This is a truly easy method of throwing the big cast nets. It is an easy method that uses gravity and centrifugal force to open the net. A caution is that this method does not work on smaller nets. It overpowers the smaller nets due to their lack of weight. An excellent way to practice, without getting wet, is to throw the net in your back yard. Grass is an excellent cushion and allows you to see how the net opened. You can practice from ground level or you can use a pickup tailgate to give you some elevation. An old tire makes an excellent target for improving your aim. Remember, practice makes perfect. |
Choosing Nets CorrectlyDepending on what kind of catch is targeted, examples are shrimp, pin fish, shiner, mullet, sardine, etc., the correct size of mesh and net will provide more accurate hauls. As with any fishing equipment, the bigger the targeted catch, the bigger size of mesh and stronger netting material needed. |
| BAIT SIZE | MESH SIZE | NET BREAK STRENGTH | | 1" - 3" | 1/4"SQ (1/2" STR.) | 5 - 9 LBS | | 3" - 6" | 3/8" SQ (3/4" STR.) | 7 - 15 LBS | | 6" - 9" | 1/2 " SQ ( 1" STR.) | 9 - 20 LBS | | 9" - 12" | 5/8" SQ (1-1/4" STR.) | 12 - 25 LBS | | 12" OVER | 1" SQ. OVER (2" STR. and OVER) | 20 LB and OVER | Cast Net CareThe most important thing in cast net care is rinsing your net after every use. Washing the net not only washes away the salt water; it also removes fish particles and slime remaining on the net. The fish slime is particularly harmful in deteriorating the net. Simply rinse well with a garden hose and allow the net to dry. Then place the net into a bucket or any other dry storage area.
Sunlight is another harmful element to the cast net. Do not allow your cast net to stay in the sunlight for long periods of time. This is especially important for monofilament cast nets. Overexposure to sunlight will cause the netting to become brittle and weak.
Another secret in cast net care is fabric softener. By using fabric softener you can prevent the net from becoming stiff and help in the overall spread of the net. Just take a pail of water, add a cup of softener, and place the cast net in the pail, for about one hour. Remove the net, rinse, and store the net after it dries. This process should be done when the net is first purchased and repeated every six to eight months. If you have any further questions, please feel free to email me or drop me a line at my office anytime and I will be glad to go over any questions that you may have. |
|
No comments:
Post a Comment